When it comes to water damage in your home, one of the most common challenges is dealing with ceiling water damage. Whether it's due to a burst pipe, a leaky roof, or plumbing issues, ceiling water damage can lead to significant problems if not quickly addressed. In this guide, we'll walk you through the process of identifying and repairing ceiling water damage in your home, while also highlighting common mistakes to avoid and discussing the pros and cons of DIY repairs versus seeking professional assistance. Plus, if you are in the area, and looking for a reliable company dealing with water damage restoration Columbia MO, we’ve got something for you! So, read on!
Understanding Ceiling Water Damage
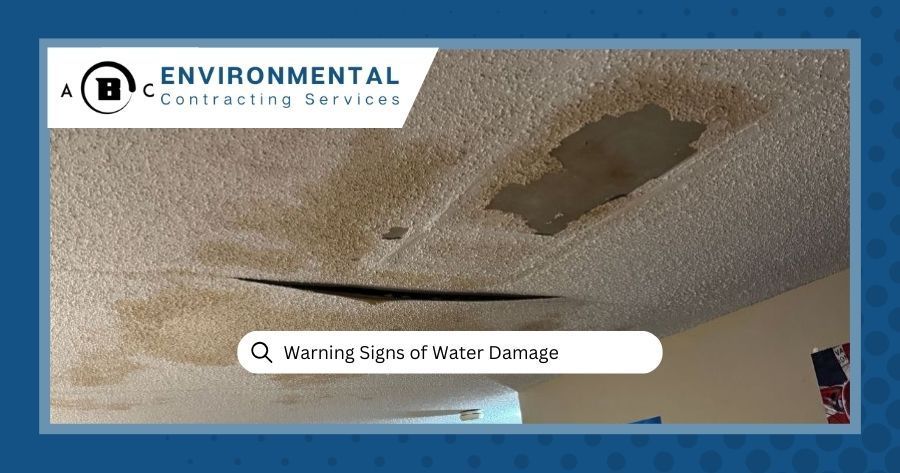
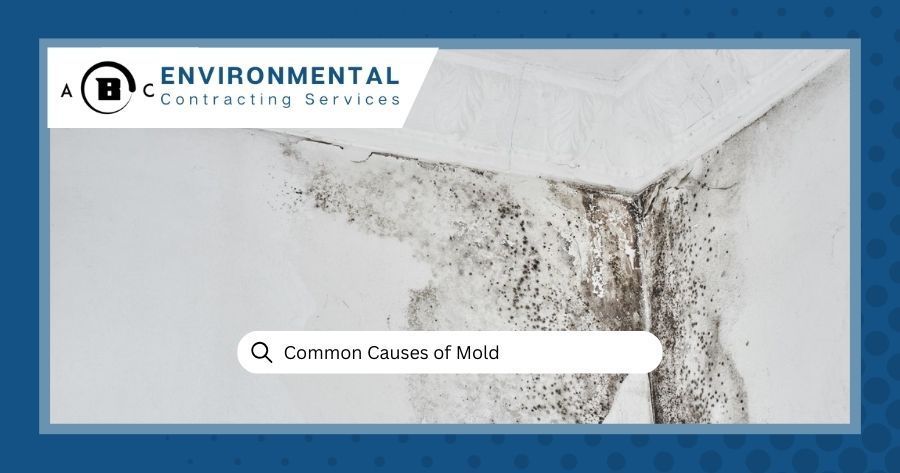
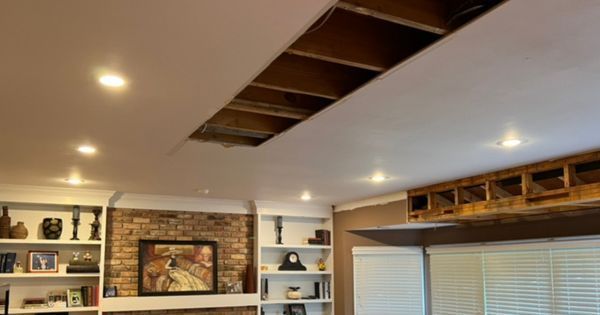
Ceiling water damage occurs when water leaks from above and soakes the ceiling material, typically drywall or plaster. This can weaken the structure, cause discoloration, and promote the growth of mold and mildew. If left untreated, it can weaken the integrity of your ceiling and lead to health issues for you and your family.
Signs of Ceiling Water Damage
Recognizing the signs of ceiling water damage is crucial for early detection and intervention. Look out for:
- Water stains or discoloration on the ceiling
- Sagging or bulging areas
- Peeling paint or wallpaper
- Musty odors
- Dripping or pooling water
How to Fix Ceiling Water Damage in Your Home?
Wondering How to fix water damaged ceiling? Attempting to repair it involves a series of steps aimed at restoring both the structural integrity and aesthetic appeal of your ceiling. From pinpointing and resolving the source of the water leak to the careful process of drying, and repairing the affected area, each step plays a vital role in ensuring a successful restoration.
But before you start, it might be helpful to inform yourself about some of the FEMA resources and guidance, including tips for prevention and recovery from water damage.
Here’s the outline of the steps:
- Locate and Stop the Water Source: The first step is to identify and fix the source of the water leak. This may require plumbing repairs, roof maintenance, or sealing gaps and cracks.
- Dry the Area: Use fans, dehumidifiers, and towels to remove excess moisture from the affected area. Proper ventilation is crucial to prevent mold growth.
- Replace or Remove the Damaged Parts: Depending on the extent of the damage, you may need to replace or remove the affected ceiling material. Cut out any water-damaged section and replace it with new material.
- Restore the Ceiling: Once the area is dry and free of damage, apply a coat of primer and paint to restore the appearance of the ceiling. Be sure to use mold-resistant products to prevent future issues.
- Paint the Ceiling: Finally, apply a fresh coat of paint to the repaired area to blend it seamlessly with the rest of the ceiling.
Water Damage Drywall Ceiling Repair
Repairing drywall is often a significant part of the water-damaged ceiling restoration process. Here's a basic guide on how to repair water-damaged drywall:
- Assess the Damage: Begin by assessing the extent of the damage to the drywall. Look for signs of water saturation, such as soft spots, sagging, or discoloration.
- Cut Out Damaged Sections: Using a utility knife, carefully cut out the damaged portions of the drywall. Ensure that you cut back to where the drywall is still structurally sound and free from water damage.
- Dry the Area: Before moving on with repairs, it's essential to thoroughly dry the affected area. Use fans, dehumidifiers, or a drywall-specific drying compound to remove any moisture.
- Replace with New Drywall: Once the area is dry, cut a replacement piece of drywall to fit the space you've removed. Secure it in place using drywall screws or nails, making sure to leave a small gap around the edges for joint compound.
- Tape and Mud: Apply drywall joint tape over the seams between the old and new drywall sections. Then, using a putty knife, apply joint compound (mud) over the tape, smoothing the edges to blend with the surrounding ceiling.
- Sand and Smooth: Once the joint compound is dry, sand the repaired area smoothly using fine-grit sandpaper. Wipe away any dust with a damp cloth.
- Prime and Paint: Finally, apply a coat of primer to the repaired area to seal the drywall and ensure the adhesion of the paint. Once the primer is dry, paint the ceiling to match the surrounding area.
Common Mistakes to Avoid
As you navigate through the process of repairing ceiling water damage in your home, it's important to be aware of common pitfalls that could potentially slow down your efforts.
- Ignoring the Problem: Even minor water damage can escalate quickly if not tackled as soon as possible.
- Neglecting Proper Ventilation: Without adequate airflow, moisture can become trapped and lead to mold growth.
- Failing to Address the Underlying Cause: Fixing the visible damage without tackling the source of the leak will only result in recurring issues.
- Using Inappropriate Materials: Choosing the wrong materials for repairing ceiling water damage, such as non-water-resistant paints or insufficient insulation, can lead to further deterioration and the need for additional repairs.
- Rushing the Drying Process: Attempting to speed up the drying process by using excessive heat or fans can result in uneven drying and potential damage to the ceiling structure. It's essential to allow sufficient time for thorough drying to prevent mold growth and structural issues.
DIY vs. Professional Repair
While some minor ceiling water damage repairs can be tackled as a DIY project, more extensive damage or structural issues may require professional assistance. A qualified water damage restoration contractor has the expertise and equipment to handle complex repairs safely and effectively. Apart from that, seeking professional help can ensure that the underlying cause of the water damage is properly handled, preventing future issues and ensuring the long-term integrity of your ceiling.
Reach Out to ABC Environmental Contracting Services in Columbia
If you are dealing with water damage in Columbia, MO, we have a perfect match for you. At ABC Environmental Contracting Services in Columbia, we take pride in our work and stand behind every job we do. Our team is available 24 hours a day, 7 days a week to answer any water damage questions you may have or to schedule a free consultation. Yours is just to call us at (573) 928-2668 or fill out our online form.
More To Explore